Flashing Espurna on your NodeMCU
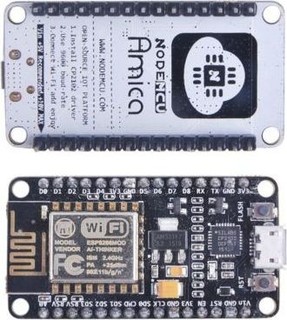
I have an Amica NodeMCU clone and I was thinking about trying the ESPurna (means “spark” in Catalan) firmware on it.

First, let’s install esptool, using pip:
$ sudo pip install --upgrade esptool
Plug the NodeMCU via USB to your computer, and get information about the device:
$ esptool.py flash_id

esptool.py v2.6
Found 1 serial ports
Serial port /dev/ttyUSB0
Connecting....
Detecting chip type... ESP8266
Chip is ESP8266EX
Features: WiFi
MAC: 60:01:94:20:24:ad
Uploading stub...
Running stub...
Stub running...
Manufacturer: c8
Device: 4016
Detected flash size: 4MB
Hard resetting via RTS pin...
In my case it’s a 4MB device, so we’ll use 0x400000 in the next command (adjust to 1 or 2 depending your device flash size).
Let’s backup the firmware:
$ esptool.py --port /dev/ttyUSB0 read_flash 0x00000 0x400000 nodemcu-alex-4MB-backup.bin

esptool.py v2.6
Serial port /dev/ttyUSB0
Connecting....
Detecting chip type... ESP8266
Chip is ESP8266EX
Features: WiFi
MAC: 60:01:94:20:24:ad
Uploading stub...
Running stub...
Stub running...
4194304 (100 %)
4194304 (100 %)
Read 4194304 bytes at 0x0 in 373.7 seconds (89.8 kbit/s)...
Hard resetting via RTS pin...
Now let’s erase the flash. It’s import to do that to remove eventual leftover configurations from previous firmware that would lead to problems or instability:
$ esptool.py --port /dev/ttyUSB0 erase_flash
Next, download the firmware that matches your board from the Espurna releases page.
Now we’re ready to flash it to the board:
$ esptool.py --port /dev/ttyUSB0 write_flash --flash_size detect --flash_mode dout 0x00000 Downloads/espurna-1.13.5-nodemcu-lolin.bin

esptool.py v2.6
Serial port /dev/ttyUSB0
Connecting....
Detecting chip type... ESP8266
Chip is ESP8266EX
Features: WiFi
MAC: 60:01:94:20:24:ad
Uploading stub...
Running stub...
Stub running...
Configuring flash size...
Auto-detected Flash size: 4MB
Compressed 473952 bytes to 339960...
Wrote 473952 bytes (339960 compressed) at 0x00000000 in 30.2 seconds (effective 125.6 kbit/s)...
Hash of data verified.
That’s basically it. Took me between 5 and 10 minutes. Now we can head to the configuration of the Espurna.
